407 – Canine Action Photography Tips, Tools and Rules

Canine Action Photography Tips, Tools and Rules
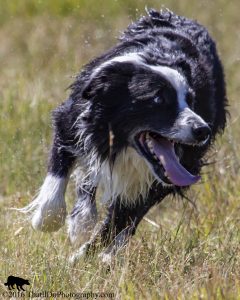
 Action photographer Bret Cody joins host Laura Reeves to talk great photos and how to capture them yourself.
Bret’s Action Photography rules:
Rule #1: Get down to eye level (it’s painful, but it’s worth it.)
Rule #2: Pay attention to your background.
- Attempt to pick a complimentary color. This is harder outside than in.
- Inside you can make your own photo “studio”, go out and buy a few yards of felt.
- For light colored dogs, pick a darker background.
- For darker colored dogs, pick a lighter background (you’re going for contrast here).
Outside the time of day can help: - need a lighter background pick some sunlit shrubbery,
- need a darker background pick some shaded shrubbery… Make sure the dog is in the light
- Put some space between your dog and the background.
- Ideally you (with your camera) should be closer to your dog than the dog is to the background. That might require a lot of space, plan for it. Take some test shots and decide how far you need to be from the dog (with your chosen gear), then look for something a little larger than double that. Doing this will set you up for some nice “bokeh” or a blurring of the background. If you can adjust your F-stop, adjust it to a fairly small number (1.5 is about max, but some gear will only reach 2.8 or even 3.5 – the idea is that the smaller the number the more effective the background blur will be.
Rule #3: My “secret weapon” Most dogs will respond to noises they can’t locate the source of. Go spend $1 on a squeeky toy. There are two ways of doing this: 1) hide the toy behind your back or under your arm 2) take the squeeker out of the toy and put it in your mouth (and simply blow through it). Get everything ready BEFORE you make any noise, it’s most likely that the picture you want will be the first split second after making the first squeek. What you are attempting to capture is “interest”. The dog (hopefully) will perk its ears, sit up straighter, and maybe look around in an attempt to find the noise. Looking at the camera is good, looking around the room isn’t so good, so be ready.
Rules for dogs in action
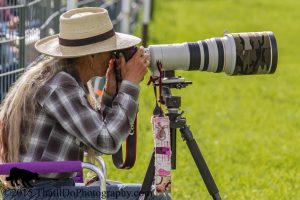 Rule #4: Shoot from a steadied position (if possible). A tripod, a fence post, even a friends shoulder (in a pinch). Making the camera (or phone) as steady as possible will help it get what you want in focus and keep it there.
Rule #5: Pick the spot you shoot from carefully. You want to see dogs, not shadows. Sometimes you don’t get a choice, but if you do, put the sun at your back. And don’t forget to move as opportunity allows. If you’re there for the day, the sun will move across the sky and you should
be moving with it.
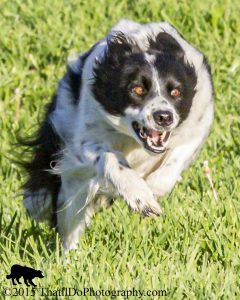
Rule #6: Pick the spot you shoot from carefully. This time pay attention to what the dog(s) are doing and were they are doing it. My favorite photos are of dogs in stress. They’ve encountered a problem and have to think their way out of it. In my case it’s unruly sheep, but it can be tracking a thrown ball (or frisbee) or finding a ball after the bounce, maybe a corner they have to navigate at top speed. Whatever that stressor is going to be, you want to place yourself so that you’ll see their face (not their tail). And be able to photograph the dog while they are thinking.
 Rule #7: A dog with “purpose” is a wonderful shot. The dog chasing a ball or frisbee has speed and purpose. Do NOT shoot the dog from behind. While it is exciting, a dog’s tail doesn’t make a good subject of a photo. My personal rule is that if I don’t see an eye it isn’t worth pushing the button on. If you have more than one subject in your shot (say a herd of sheep the dog is herding) then the more eyes the better, but the subject (mostly the dog, but that can change) had better have at least one eye in the shot. Hint: Be open for your subject to change. Sometimes another animal (sheep? cow? bird?) will do something that is absolutely amazing and swiftly changing to that action (and letting your “normal” main subject become a background subject) can get you amazing shots.
Rule #8: Study your tool. If you’re using a phone, what can it do? How does it do it? Can an app help gain more flexibility or control? If you’re shooting a camera what can it do and how does it do it? Does it have manual controls (can you pick the shutter speed, aperture, ISO, etc)? What do you have to do to tinker with those controls? The less control you have over the behavior of your tool the more you’ll have to adapt to it, to get the most from it. Camera manufacturers build for general use and shooting dogs in action is very specific. The more professional tools will be more adaptable to specific tasks. That doesn’t mean go out and spend $20,000. I’m not even saying go out and spend anything (other than $1 on a squeeky toy).
Use what you have available. Look at your results and decide for yourself what’s wrong with the picture. Then attempt to find a solution to your problem (with the tool you have). (Classes might be an option here, but mostly I find the instructor teaching the class how to be
“just like him” – and you need to know how to be a better you.) I’m pretty positive that you can be your own best instructor. You’ll need specific info and that is what the web is for, ask it. Read widely (one person will have one point of view and you need more than one point of view.) Go out and try what you’ve learned, fail, adapt and try again. You’ll end up a MUCH better photographer – the struggle is the lesson. Someday, you’ll have mastered your tool. You’ll find that it limits you. It just can’t do what you know can be done. THEN you should think about upgrading your tool. And by then you’ll have some solid information about your upgrade path.
Photography specific
Rule #9: Shoot in “action mode” or “sport mode.” If you have control over the settings of your camera, you’re looking for a fast shutter speed (I try to shoot faster than 1/1000th of a second). You need to stop the action (to prevent blur) and the easiest way is to simple shoot
as fast as possible. But short exposures mean your limiting the light that gets to the chip (film) (more about this in a bit).
Rule #10: Shoot as high an f-stop as possible. Larger numbers of F-stop mean more depth of field AND less light getting to the sensor. Understand that F-stop and aperture size are inversely proportional. Large number = small hole. So, if you’re shooting a fast shutter speed (which limits the amount of light) AND a large F-stop (which limits the amount of light) you can see the problem. At the settings you want, you’ve got no light to record.
Rule #12: (The third part of exposure) ISO. Higher ISO means making the imaging chip more sensitive to light. Higher ISO number mean you can have BOTH a fast shutter speed and a high F-Stop. The cost is “noise” (think error). The chip will get it “wrong” more often.
Rule #13 Shoot RAW. Think of it this way: Larger files = More detail. You want to capture as much detail as possible, and RAW will help you do that. JPG is a compression formula (to make smaller files and to save space) and so much of the detail captured by the chip is thrown out by
the computer.
Rule #14 Learn how to read and use the histogram. Learn about STTR (Shoot To The Right). The chip doesn’t see light the same way your eye does. So it records it differently. The histogram is a graph of what light was captured. To maximize the amount of detail, adjust the
exposure so the histogram is just about to go off the right edge of the scale. The pictures will look over exposed (because they are) and that’ll have to be fixed in editing. BUT it’s not hard to edit the exposure and keep all that detail. Oh and you’ll have to learn editing. It’s OK, you really do need a new hobby.
So, now you (and not your dog) experiences stress. How are you going to get the shot you want? What compromise is the right compromise? And it’s different for every situation. How YOU solve that problem is what makes YOUR art YOURS.
It’s not hard (or even difficult), but I’ll tell you there’s a lot of years of training (and mistakes) to get me to that point. It’s paying attention (sometimes that’s very hard for me.) It’s situational awareness (what’s happening on the field, what’s happening off the field, what’s happening behind me (did I block someone’s view and they are now upset at me? Do I need to move?) But in the end, once you get the settings, then you can work on your technique – camera steady, panning with the action, looking for eyes, behaviors on the field that tell me the dog is getting stressed (and to get ready to photograph a wreck…. this is a whole lot like NASCAR – the wrecks are horrible, but interesting.)


KNOWLEDGE IS POWER — FRANCIS BACON
When you become a patron of Pure Dog Talk you’ll tap into an exclusive community of experts to help you and your dog be blue-ribbon best at whatever you do with your purebred dog! Your support helps keep the MP3's rolling at Pure Dog Talk!
As a supporter, you’ll immediately gain access to the weekly Pure Pep Talk SMS, Pure Pep Talk private Facebook group, and priority emails. Patrons can choose to level up to the After Dark Zoom and a Patrons Digital Badge for their website— even a private counseling session with Laura on any topic.